Advanced: Custom Operators
As a reminder, there are many built-in custom operators in deps/CustomOps and they are good resources for understanding custom operators. The following is a step-by-step instruction on how custom operators are implemented.
The Need for Custom Operators
Custom operators are ways to add missing features or improve performance critical components in ADCME. Typically users do not have to worry about custom operators. However, in the following situation custom opreators might be very useful
- Direct implementation in ADCME is inefficient, e.g., vectorizing some codes is difficult.
- There are legacy codes users want to reuse, such as Fortran libraries or adjoint-state method solvers.
- Special acceleration techniques, such as checkpointing scheme, MPI-enabled linear solvers, and FPGA/GPU-accelerated codes.
The Philosophy of Implementing Custom Operators
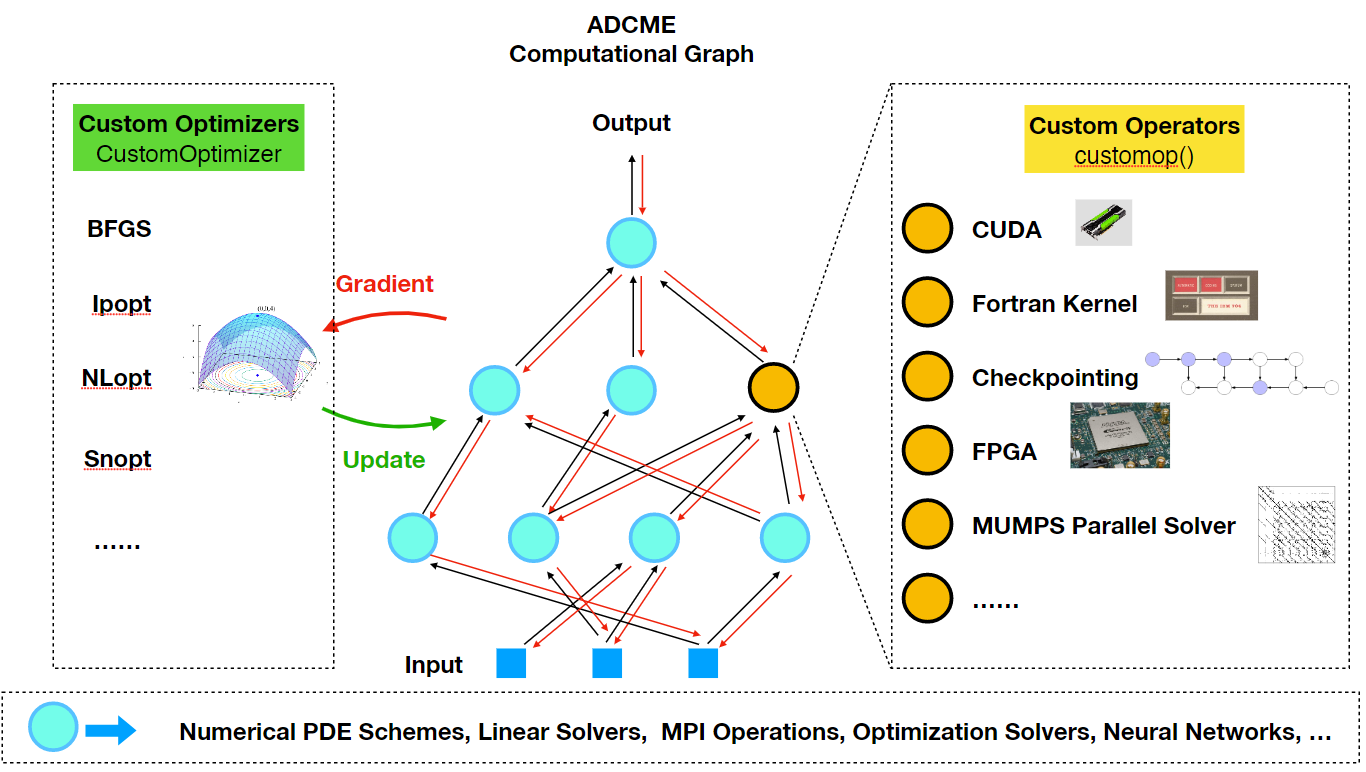
Usually the motivation for implementing custom operators is to enable gradient backpropagation for some performance critical operators. However, not all performance critical operators participate the automatic differentiation. Using terminologies from programming, these computations are "constant expressions", which can be evaluated at compilation time (constant folding). Therefore, before we devote ourselves to implementating custom operators, we need to identify which operators need to be implemented as custom operators.
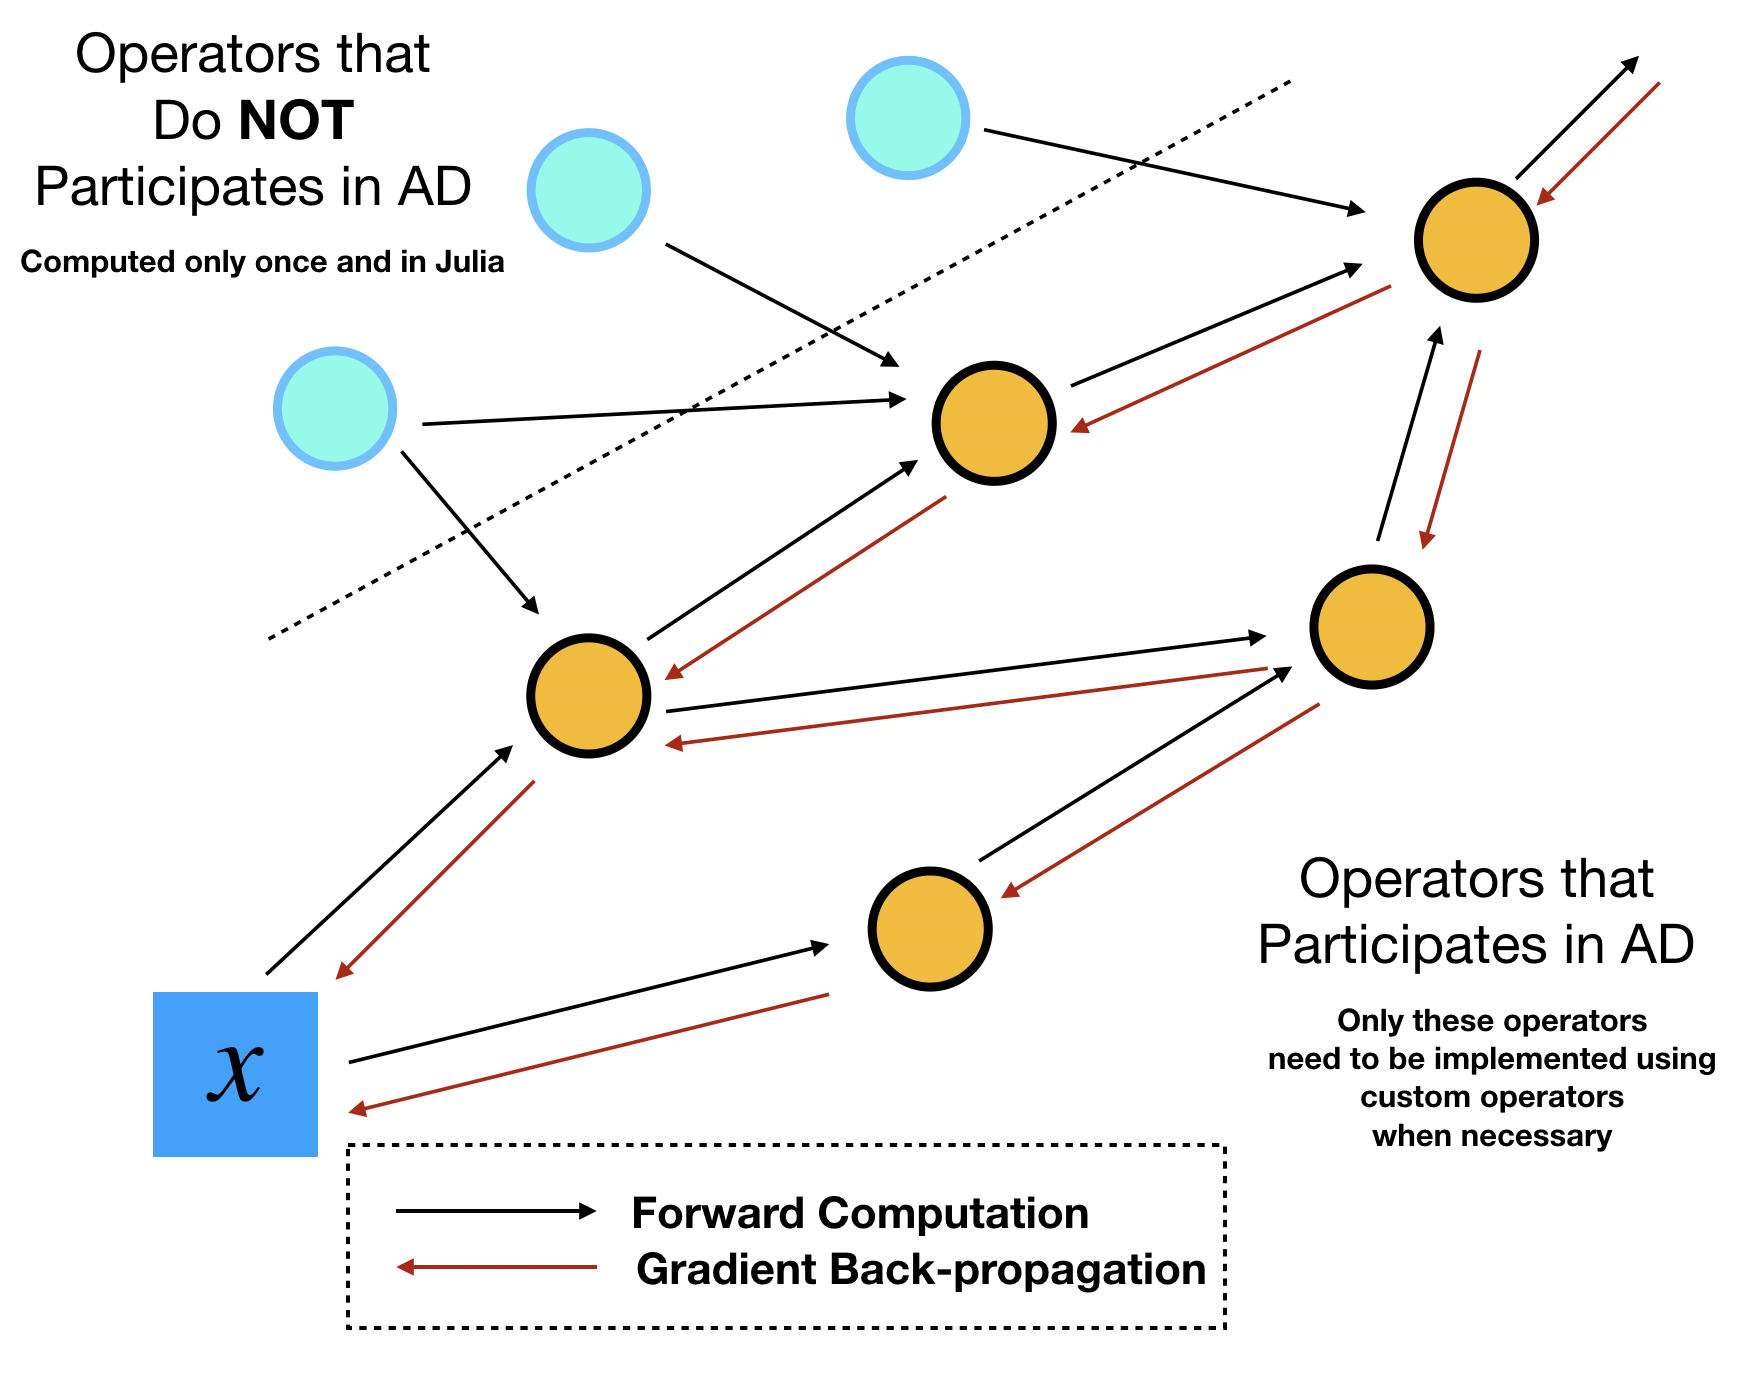
This identification task can be done by sketching out the computational graph of your program. Assume your optimization outer loops update $x$ repeatly, then we can track all downstream the operators that depend on this parameter $x$. We call the dependent operators "tensor operations", because they are essentially TensorFlow operators that consume and output tensors. The dependent variables are called "tensors". The counterpart of tensors and tensor operations are "numerical arrays" and "numerical operations", respectively. The names seem a bit vague here but the essence is that numerical operations/arrays do no participate automatic differentiation during the optimization, so the values can be precomputed only once during the entire optimization process.
In ADCME, we can precompute all numerical quantities of numerical arrays using Julia. No TensorFlow operators or custom operators are needed. This procedure combines the best of the two worlds: the simple syntax and high performance computing environment provided by Julia, and the efficient AD capability provided by TensorFlow. The high performance computing for precomputing cannot be provided by Python, the main scripting language that TensorFlow or PyTorch supports. Readers migh suspect that such precomputing may not be significant in many tasks. Actually, the precomputing constitutes a large portion in scientific computing. For example, researchers assemble matrices, prepare geometries and construct preconditioners in a finite element program. These tasks are by no means trivial and cheap. The consideration for performance in scientific computing actually forms the major motivation behind adopting Julia for the major language for ADCME.
Build Custom Operators
In the following, we present an example of implementing a sparse solver for $Au=b$ as a custom operator.
Input: row vector ii, column vectorjj and value vector vv for the sparse coefficient matrix $A$; row vector kk and value vector ff for the right hand side $b$; the coefficient matrix dimension is $d\times d$
Output: solution vector $u\in \mathbb{R}^d$
Step 1: Create and modify the template file
The following command helps create the wrapper
customop()There will be a custom_op.txt in the current directory. Modify the template file
MySparseSolver
int32 ii(?)
int32 jj(?)
double vv(?)
int32 kk(?)
double ff(?)
int32 d()
double u(?) -> output
The first line is the name of the operator. It should always be in the camel case.
The 2nd to the 7th lines specify the input arguments, the signature is type+variable name+shape. For the shape, () corresponds to a scalar, (?) to a vector and (?,?) to a matrix. The variable names must be in lower cases. Additionally, the supported types are: int32, int64, float, double, bool and string.
The last line is the output, denoted by -> output (do not forget the whitespace before and after ->).
If there are non-real type outputs, the corresponding top gradients input to the gradient kernel should be removed.
Step 2: Implement the kernels
Run customop() again and there will be CMakeLists.txt, gradtest.jl, MySparseSolver.cpp appearing in the current directory. MySparseSolver.cpp is the main wrapper for the codes and gradtest.jl is used for testing the operator and its gradients. CMakeLists.txt is the file for compilation. In the gradient back-propagation (backward below), we want to back-propagate the gradients from the output to the inputs, and the associated rule can be derived using adjoint-state methods.
Create a new file MySparseSolver.h and implement both the forward simulation and backward simulation (gradients)
#include <eigen3/Eigen/Sparse>
#include <eigen3/Eigen/SparseLU>
#include <vector>
#include <iostream>
using namespace std;
typedef Eigen::SparseMatrix<double> SpMat; // declares a column-major sparse matrix type of double
typedef Eigen::Triplet<double> T;

SpMat A;

void forward(double *u, const int *ii, const int *jj, const double *vv, int nv, const int *kk, const double *ff,int nf,  int d){
    vector<T> triplets;
    Eigen::VectorXd rhs(d); rhs.setZero();
    for(int i=0;i<nv;i++){
      triplets.push_back(T(ii[i]-1,jj[i]-1,vv[i]));
    }
    for(int i=0;i<nf;i++){
      rhs[kk[i]-1] += ff[i];
    }
    A.resize(d, d);
    A.setFromTriplets(triplets.begin(), triplets.end());
    auto C = Eigen::MatrixXd(A);
    Eigen::SparseLU<SpMat> solver;
    solver.analyzePattern(A);
    solver.factorize(A);
    auto x = solver.solve(rhs);
    for(int i=0;i<d;i++) u[i] = x[i];
}

void backward(double *grad_vv, const double *grad_u, const int *ii, const int *jj, const double *u, int nv, int d){
    Eigen::VectorXd g(d);
    for(int i=0;i<d;i++) g[i] = grad_u[i];
    auto B = A.transpose();
    Eigen::SparseLU<SpMat> solver;
    solver.analyzePattern(B);
    solver.factorize(B);
    auto x = solver.solve(g);
    // cout << x << endl;
    for(int i=0;i<nv;i++) grad_vv[i] = 0.0;
    for(int i=0;i<nv;i++){
      grad_vv[i] -= x[ii[i]-1]*u[jj[i]-1];
    }
}In this implementation we have used Eigen library for solving sparse matrix. Other choices are also possible, such as algebraic multigrid methods. Note here for convenience we have created a global variable SpMat A;. This is not recommend if you want to run the code concurrently, since the variable A must be overwritten by another concurrent thread.
Step 3: Compile
You should always compile your custom operator using the built-in toolchain ADCME.make and ADCME.cmake to ensure compatibility such as ABIs. The built-in toolchain uses exactly the same compiler that has been used to compile your tensorflow shared library. For example, some of the toolchain variables are:
| Variable | Description |
|---|---|
ADCME.CXX | C++ Compiler |
ADCME.CC | C Compiler |
ADCME.TF_LIB_FILE | libtensorflow_framework.so location |
ADCME.CMAKE | Cmake binary location |
ADCME.MAKE | Make (Ninja for Unix systems) binary location |
ADCME will properly handle the environment variable for you. So we always recommend you to compile custom operators using ADCME functions:
First cd into your custom operator director (where CMakeLists.txt is located), create a directory build if it doesn't exist, cd into build, and do
julia> using ADCME
julia> ADCME.cmake()
julia> ADCME.make()
Based on your operation system, you will create libMySparseSolver.{so,dylib,dll}. This will be the dynamic library to link in TensorFlow.
Step 4: Test
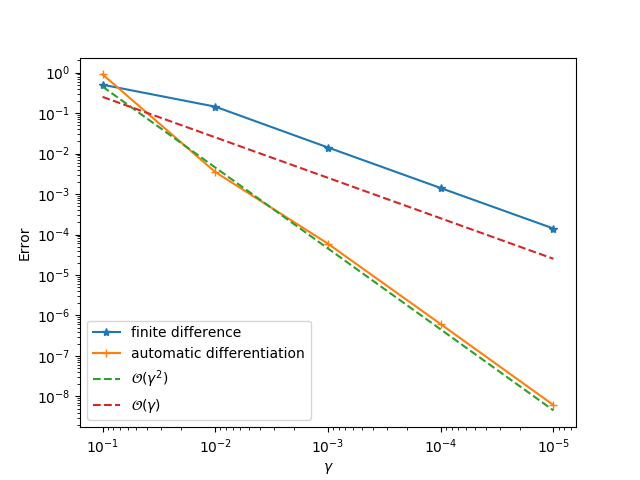
Finally, you could use gradtest.jl to test the operator and its gradients (specify appropriate data in gradtest.jl first). If you implement the gradients correctly, you will be able to obtain first order convergence for finite difference and second order convergence for automatic differentiation. Note you need to modify this file first, e.g., creating data and modifying the function scalar_function.
If the process fails, it is most probable the GCC compiler is not compatible with which was used to compile libtensorflow_framework.{so,dylib}. ADCME downloads a GCC compiler via Conda for you. However, if you follow the above steps but encounter some problems, we are happy to resolve the compatibility issue and improve the robustness of ADCME. Submitting an issue is welcome.
Please see this repository for an extra example.
Build GPU Custom Operators
Install GPU-enabled TensorFlow (Linux and Windows)
Standard Installation
To use CUDA in ADCME, we need to install a GPU-enabled version of TensorFlow. In ADCME, this is achieved by simply rebuilding ADCME with GPU environment variabe.
using Pkg
ENV["GPU"] = 1
Pkg.build("ADCME")
This will install all GPU dependencies.
Docker Installation
A simpler way to install GPU-enabled ADCME is via Docker.
docker pull kailaix/adcme:gpu
docker run -ti --gpus all kailaix/adcme
Here --gpus all directs Docker to use all GPU resources. If you want to use only a certain number of GPU resources, e.g., 2 GPUs, you can use --gpus 2.
The above command will bring up a Julia prompt where GPU-enabled ADCME is already installed.
Building a GPU custom operator
To illustrate the usage, we consider two examples. In the first example, the custom operator will return a vector $y = 2x$, where $x$ is the input vector. We will implement both forward and backward computations. In the second example, we implement a custom operator that uses cuBLAS, $y = Ax$, where the input $A$ is a $m\times m$ matrix, and $x$ is a vector of size $m$.
Example 1
First, we run customop to generate the templates.
using ADCME
customop()
We change custom_op.txt to
MultiplyByTwo
double x()
double y() -> output
and rerun customop(). This will generates all the template files.
Edit the files as in this directory. Then we can compile the custom operator
change_directory("build")
ADCME.cmake()
ADCME.make()
Then run gradtest.jl to verify the results.
Example 2
In this example, we implement the matrix vector multiplication
\[y = Ax\]
Different from Example 1, we need to call a cuBLAS function from the CUDA toolkit. However, the procedure is quite similar.
Refer to this directory for source codes
Batch Build
At some point, you might have a lot of custom operators. Building one-by-one will take up too much time. To reduce the building time, you might want to build all the operators all at once concurrently. To this end, you can consider batch build by using a common CMakeLists.txt. The commands in the CMakeLists.txt are the same as a typical custom operator, except that the designated libraries are different
# ... The same as a typical CMake script ...

# Specify all the library paths and library names.
set(LIBDIR_NAME VolumetricStrain ComputeVel DirichletBd
    FemStiffness FemStiffness1 SpatialFemStiffness
    SpatialVaryingTangentElastic Strain Strain1
    StrainEnergy StrainEnergy1)
set(LIB_NAME VolumetricStrain ComputeVel DirichletBd
    FemStiffness UnivariateFemStiffness SpatialFemStiffness
    SpatialVaryingTangentElastic StrainOp StrainOpUnivariate
    StrainEnergy StrainEnergyUnivariate)

# Copy and paste the following lines (no modification is required)
list(LENGTH "LIBDIR_NAME" LIBLENGTH)
message("Total number of libraries to make: ${LIBLENGTH}")
MATH(EXPR LIBLENGTH "${LIBLENGTH}-1")
foreach(IDX RANGE 0 ${LIBLENGTH})
  list(GET LIBDIR_NAME ${IDX} _LIB_DIR)
  list(GET LIB_NAME ${IDX} _LIB_NAME)
  message("Compiling ${IDX}th library: ${_LIB_DIR}==>${_LIB_NAME}")
  file(MAKE_DIRECTORY ${_LIB_DIR}/build)
  add_library(${_LIB_NAME} SHARED ${_LIB_DIR}/${_LIB_NAME}.cpp)
  set_property(TARGET ${_LIB_NAME} PROPERTY POSITION_INDEPENDENT_CODE ON)
  set_target_properties(${_LIB_NAME} PROPERTIES LIBRARY_OUTPUT_DIRECTORY ${CMAKE_SOURCE_DIR}/${_LIB_DIR}/build)
  target_link_libraries(${_LIB_NAME} ${TF_LIB_FILE})
endforeach(IDX)
Loading Order
To ensure that TensorFlow can find all the registered symbols, it is recommended that you should always load the shared libraries first if you also run ccall on the shared library. This can be done using load_library to obtain a handle to the shared library. Then you can use the handle in load_op_and_grad or load_op. For example
lib = load_library("path/to/my/library")
my_custom_op = load_op_and_grad(lib, "my_custom_op")
Error Handling
Sometimes we might encounter error in C++ kernels and we want to propagate the error to the Julia interface. This is done by OP_REQUIRES_OK. Its syntax is
OP_REQUIRES_OK(context, status)where context is either a OpKernelConstruction or a OpKernelContext, and status can be created using
Status(error::Code::ERROR_CODE, message)Here ERROR_CODE is one of the following:
OK = 0,
CANCELLED = 1,
UNKNOWN = 2,
INVALID_ARGUMENT = 3,
DEADLINE_EXCEEDED = 4,
NOT_FOUND = 5,
ALREADY_EXISTS = 6,
PERMISSION_DENIED = 7,
UNAUTHENTICATED = 16,
RESOURCE_EXHAUSTED = 8,
FAILED_PRECONDITION = 9,
ABORTED = 10,
OUT_OF_RANGE = 11,
UNIMPLEMENTED = 12,
INTERNAL = 13,
UNAVAILABLE = 14,
DATA_LOSS = 15,
DO_NOT_USE_RESERVED_FOR_FUTURE_EXPANSION_USE_DEFAULT_IN_SWITCH_INSTEAD_ = 20,
Code_INT_MIN_SENTINEL_DO_NOT_USE_ = std::numeric_limits<::PROTOBUF_NAMESPACE_ID::int32>::min(),
Code_INT_MAX_SENTINEL_DO_NOT_USE_ = std::numeric_limits<::PROTOBUF_NAMESPACE_ID::int32>::max()
message is a string.
For example,
OP_REQUIRES_OK(context,
        Status(error::Code::UNAVAILABLE, "Sparse solver type not supported."));
Logging
TensorFlow has a C++ level logging system. We can conveniently log messages to specific streams using the folloing syntax
VLOG(INFO) << message;
VLOG(WARNING) << message;
VLOG(ERROR) << message;
VLOG(FATAL) << message;
VLOG(NUM_SEVERITIES) << message;
Windows: Load Shared Library
Sometimes you might encounter NotFoundError() when using tf.load_op_library on Windows system, despite that the library you referred does exist. You can then check using Libdl
using Libdl
dlopen(<MySharedLibrary.dll>)
and you still get an error
ERROR: could not load library "MySharedLibrary.dll"
The specified module could not be found.
This is annoying. The reason is that when you load this shared library on windows, the system looks for all its dependencies. If at least one of the dependent library is not in the path, then the error occurs. To solve this problem, you need a dependency walker, such as die.exe.
For example, in the following right panel we see a lot of dynamic libraries. They must be in the system path so that we can load the current dynamic library (dlopen(...)).
| Main Window | Import Window |
|---|---|
 |  |
Miscellany
Mutable Inputs
Sometimes we want to modify tensors in place. In this case we can use mutable inputs. Mutable inputs must be Variable and it must be forwarded to one of the output. We consider implement a my_assign operator, with signature
my_assign(u::PyObject, v::PyObject)::PyObjectHere u is a Variable and we copy the data from v to u. In the MyAssign.cpp file, we modify the input and output specifications to
.Input("u : Ref(double)")
.Input("v : double")
.Output("w : Ref(double)")
In addition, the input tensor is obtained through
Tensor u = context->mutable_input(0, true);The second argument lock_held specifies whether the input mutex is acquired (false) before the operation. Note the output must be a Tensor instead of a reference.
To forward the input, use
context->forward_ref_input_to_ref_output(0,0);We use the following code snippet to test the program
my_assign = load_op("./build/libMyAssign","my_assign")
u = Variable([0.1,0.2,0.3])
v = constant(Array{Float64}(1:3))
u2 = u^2
w = my_assign(u,v)
sess = tf.Session()
init(sess)
@show run(sess, u)
@show run(sess, u2)
@show run(sess, w)
@show run(sess, u2)
The output is
[0.1,0.2,0.3]
[0.1,0.04,0.09]
[1.0,2.0,3.0]
[1.0,4.0,9.0]
We can see that the tensors depending on u are also aware of the assign operator. The complete programs can be downloaded here: CMakeLists.txt, MyAssign.cpp, gradtest.jl.
Third-party Plugins
ADCME also allows third-party custom operators hosted on Github. To build your own custom operators, implement your own custom operators in a Github repository.
Users are free to arrange other source files or other third-party libraries.
Upon using those libraries in ADCME, users first download those libraries to deps directory via
pth = install("OTNetwork")pth is the dynamic library product generated with source codes in OTNetwork. The official plugins are hosted on https://github.com/ADCMEMarket. To get access to the custom operators in ADCME, use
op = load_op_and_grad(pth, "ot_network"; multiple=true)- https://on-demand.gputechconf.com/ai-conference-2019/T1-3Minseok%20LeeAdding%20custom%20CUDA%20C++%20Operations%20in%20Tensorflow%20for%20boosting%20BERT%20Inference.pdf)
Troubleshooting
Here are some common errors you might encounter during custom operator compilation:
Q: The cmake output for the Julia path is empty.
Julia=A: Check whether which julia outputs the Julia location you are using.
Q: The cmake output for Python path, Eigen path, etc., is empty.
Python path=
PREFIXDIR=
TF_INC=
TF_ABI=
TF_LIB_FILE=
A: Update ADCME to the latest version and check whether or not the ADCME compiler string is empty
using ADCME
ADCME.__STR__
Q: Julia package precompilation errors that seem not linked to ADCME.
A: Remove the corresponding packages using using Pkg; Pkg.rm(XXX) and reinstall those packages.
Q: Precompilation error linked to ADCME
ERROR: LoadError: ADCME is not properly built; run `Pkg.build("ADCME")` to fix the problem.A: Build ADCME using Pkg.build("ADCME"). Exit Julia and open Julia again. Check whether deps.jl exists in the deps directory of your Julia package (optional).